
From zero to your first prototype no design experience needed
Hey everyone. Claude Design just launched and the internet went quiet for a second. Then it exploded.
Figma's stock dropped over 4% on launch day. Founders were posting prototypes they'd built in ten minutes.
People who had never opened a design tool in their lives were shipping pitch decks to investors.
If you're wondering what the fuss is about and more importantly how to actually use it
this guide is for you. We're going step by step. Setup, prompts, editing, exporting, all of it.
Let's get into it.
What is Claude Design?

Claude Design is a new Anthropic Labs product that lets you collaborate with Claude to create polished visual work like designs, prototypes, slides, one-pagers, and more. It is powered by Claude Opus 4.7, Anthropic's most capable vision model.
Think of it as a bridge. On one side, you have your idea. On the other side, you have something your team can actually react to. Claude Design sits in the middle.
You don't need to know how to use design software. You just need to know how to explain what you want.
Who is this for?
- Founders who need a pitch deck before Friday
- Product managers who want to show how a new feature should look
- Marketers who need campaign visuals without waiting on a designer
- Developers who want to prototype a full product without hiring anyone
What it is NOT
It is not a replacement for Figma for production design work. It is not a tool where you drag and drop shapes from scratch.
It is an AI generator that understands your brand and builds from a plain English description.
Real teams are already using it for things like this.
Datadog went from a rough idea to a working prototype before anyone left the room, and the output stayed true to their brand and design guidelines.
What used to take a week of back-and-forth between briefs, mockups, and review rounds now happens in a single conversation.
Who can access it
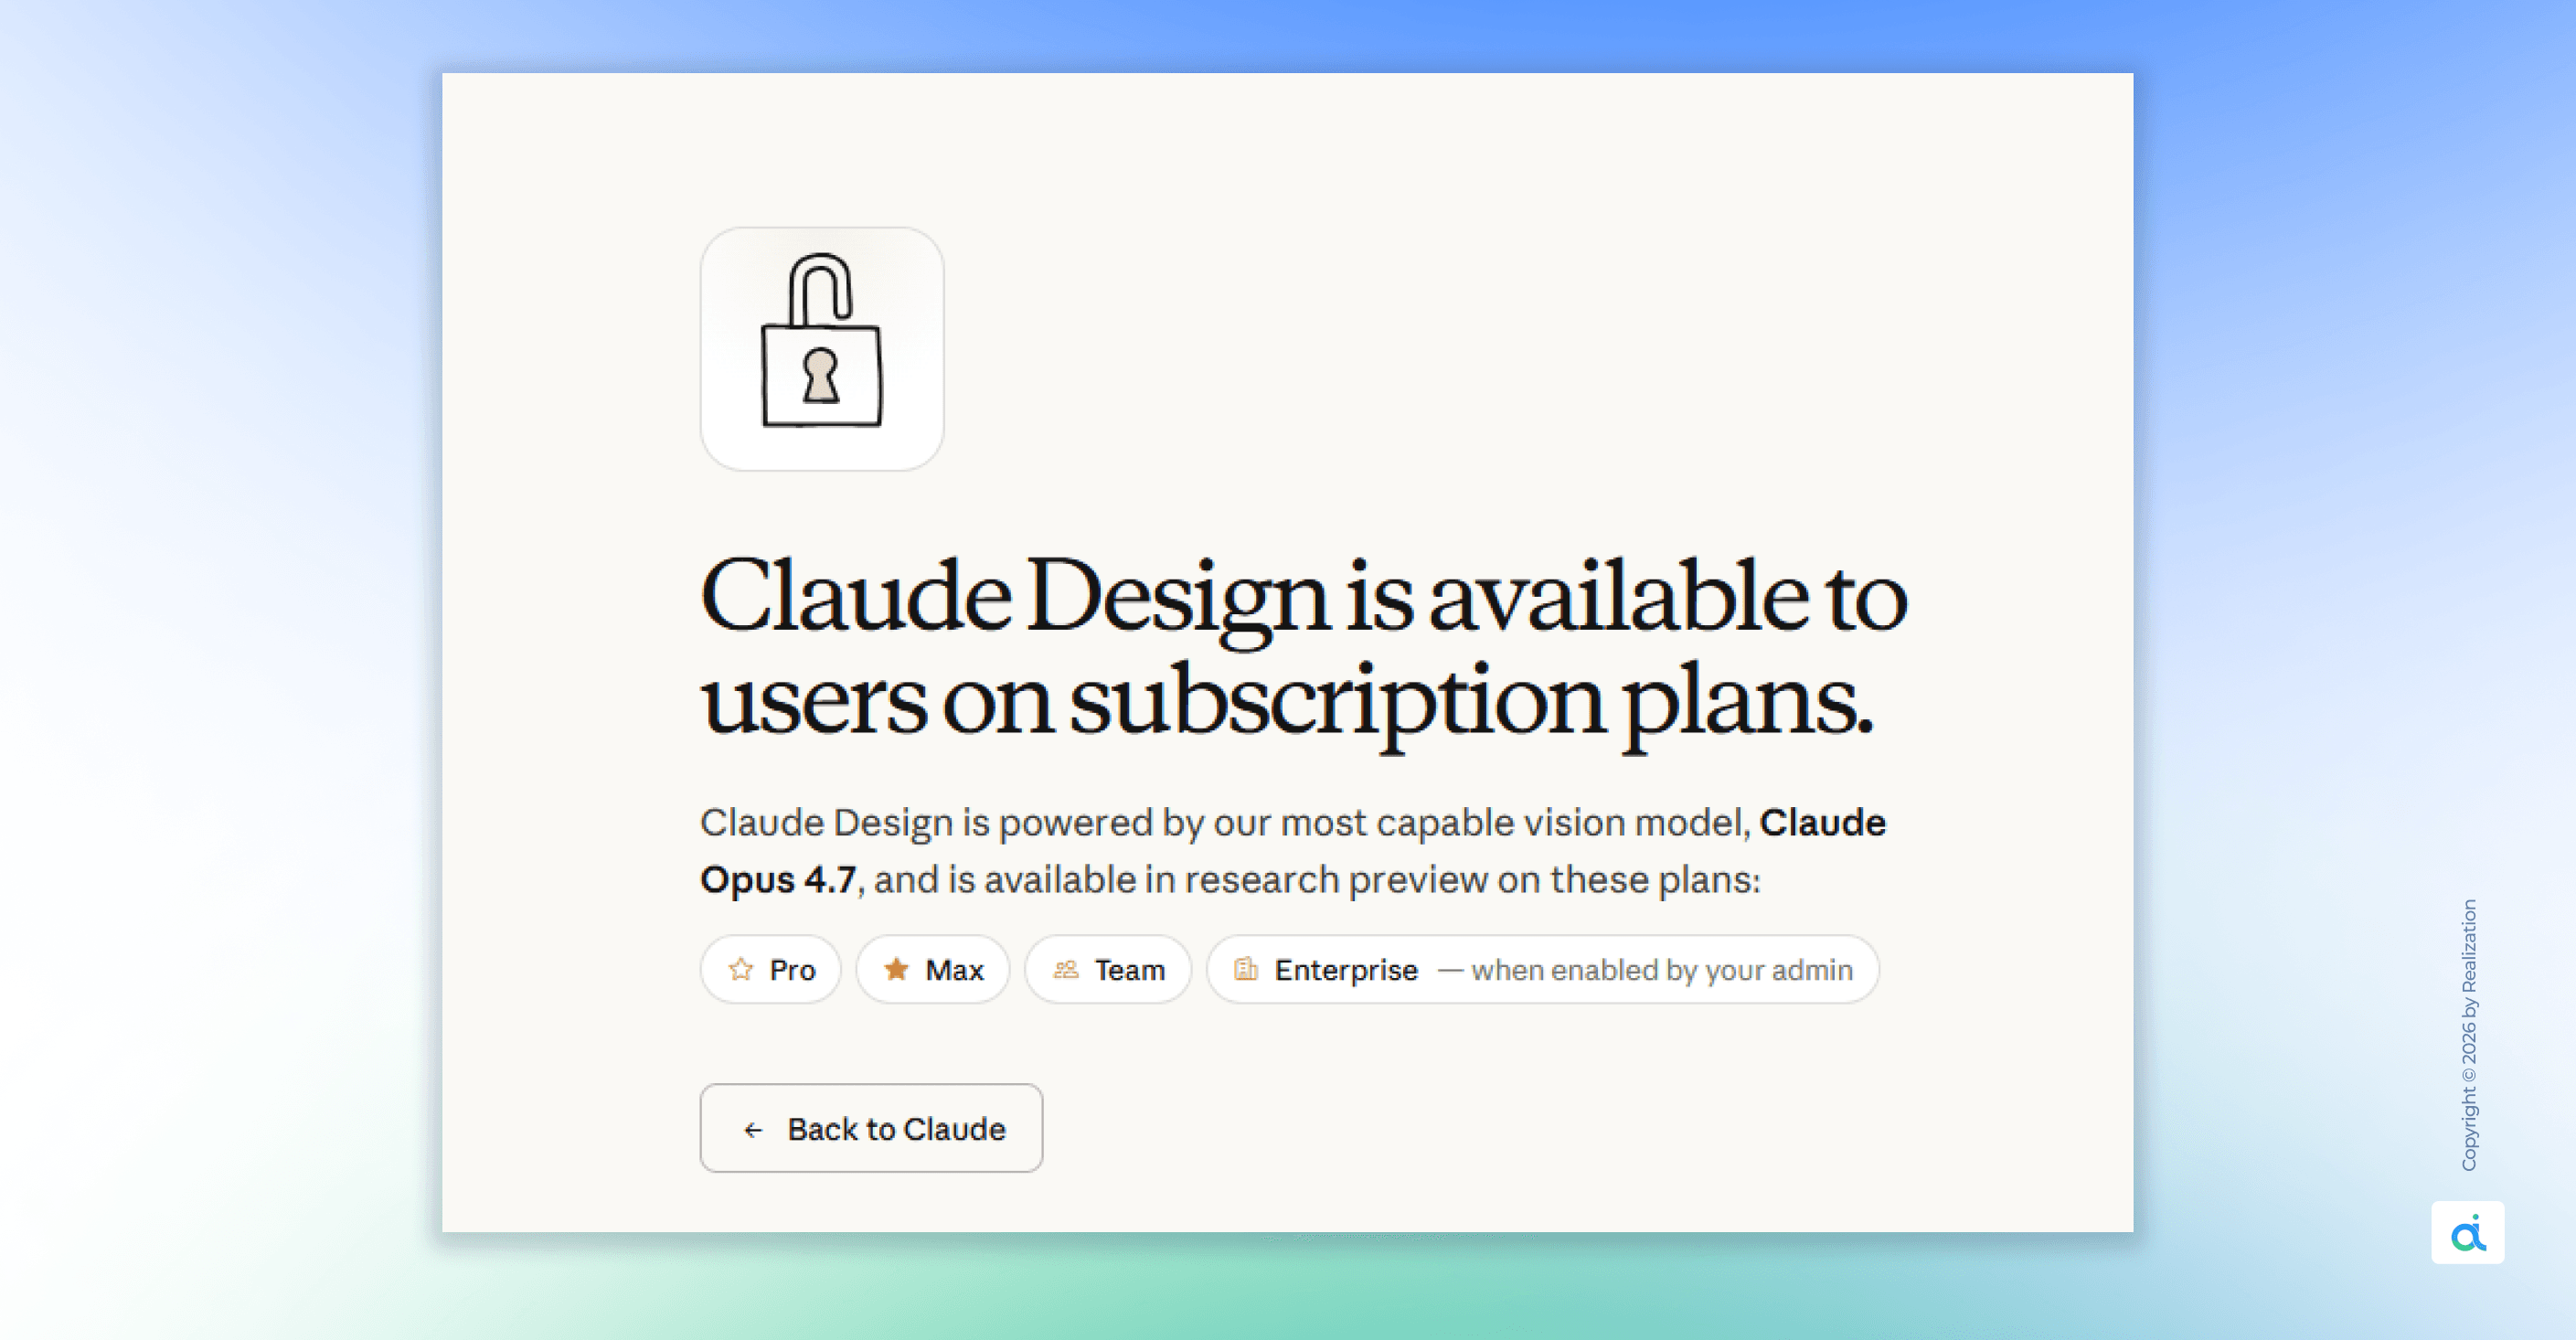
Claude Design is available in research preview for Claude Pro, Max, Team, and Enterprise subscribers. Access is included with your plan and uses your subscription limits, with the option to continue beyond those limits by enabling extra usage.
Here's a quick breakdown:
- Claude Pro - $20/month, individual access
- Claude Max - higher individual tier
- Claude Team - for small groups
- Claude Enterprise - for larger companies
One important note: for Enterprise organizations, Claude Design is off by default. Admins can enable it in Organization settings.
So if you're on Enterprise and don't see it, that's why you should ask your admin to turn it on.
No extra fee for now. It draws from your existing plan limits.
Step 1: Open Claude Design
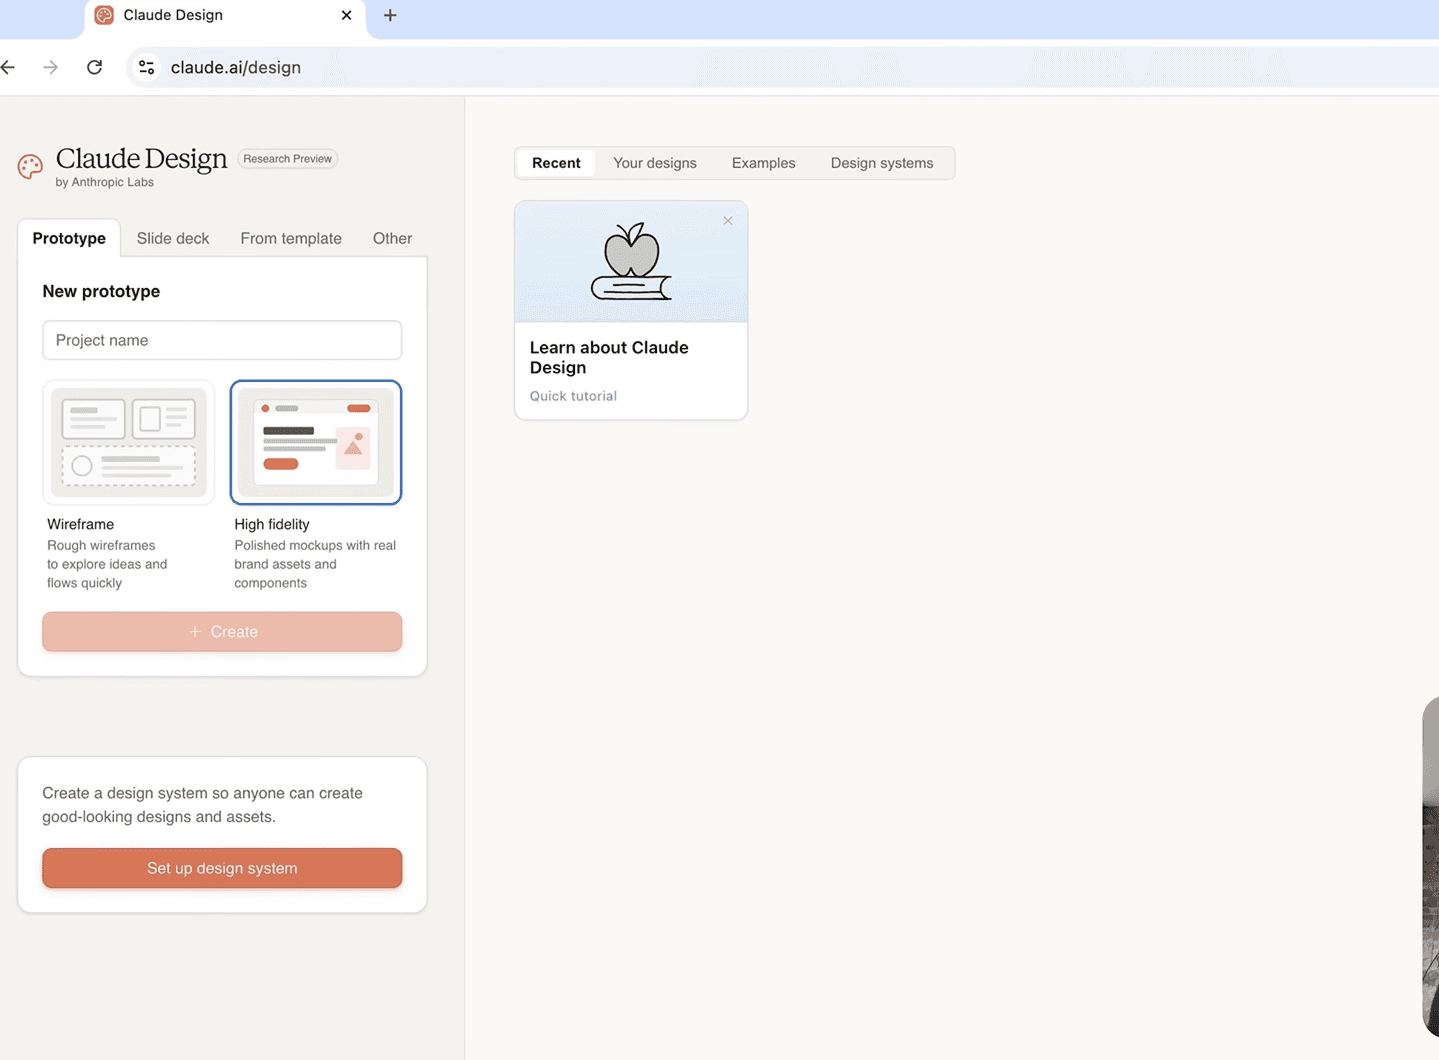
- Go to claude.ai/design. Log in to your Claude account.
- You'll land in the Design workspace.
- The layout is two panes. Chat on the left, canvas on the right. You type in the chat.
- Claude builds on the canvas.
- Everything else you learn from here is just getting better at using those two panes together.
One thing to know before you start:
Claude Design is web only. No desktop app, no install.
It runs entirely in your browser, because visual editing works best there, and it keeps the tool accessible from any machine.
Step 2: Set up your design system. Do this before anything else
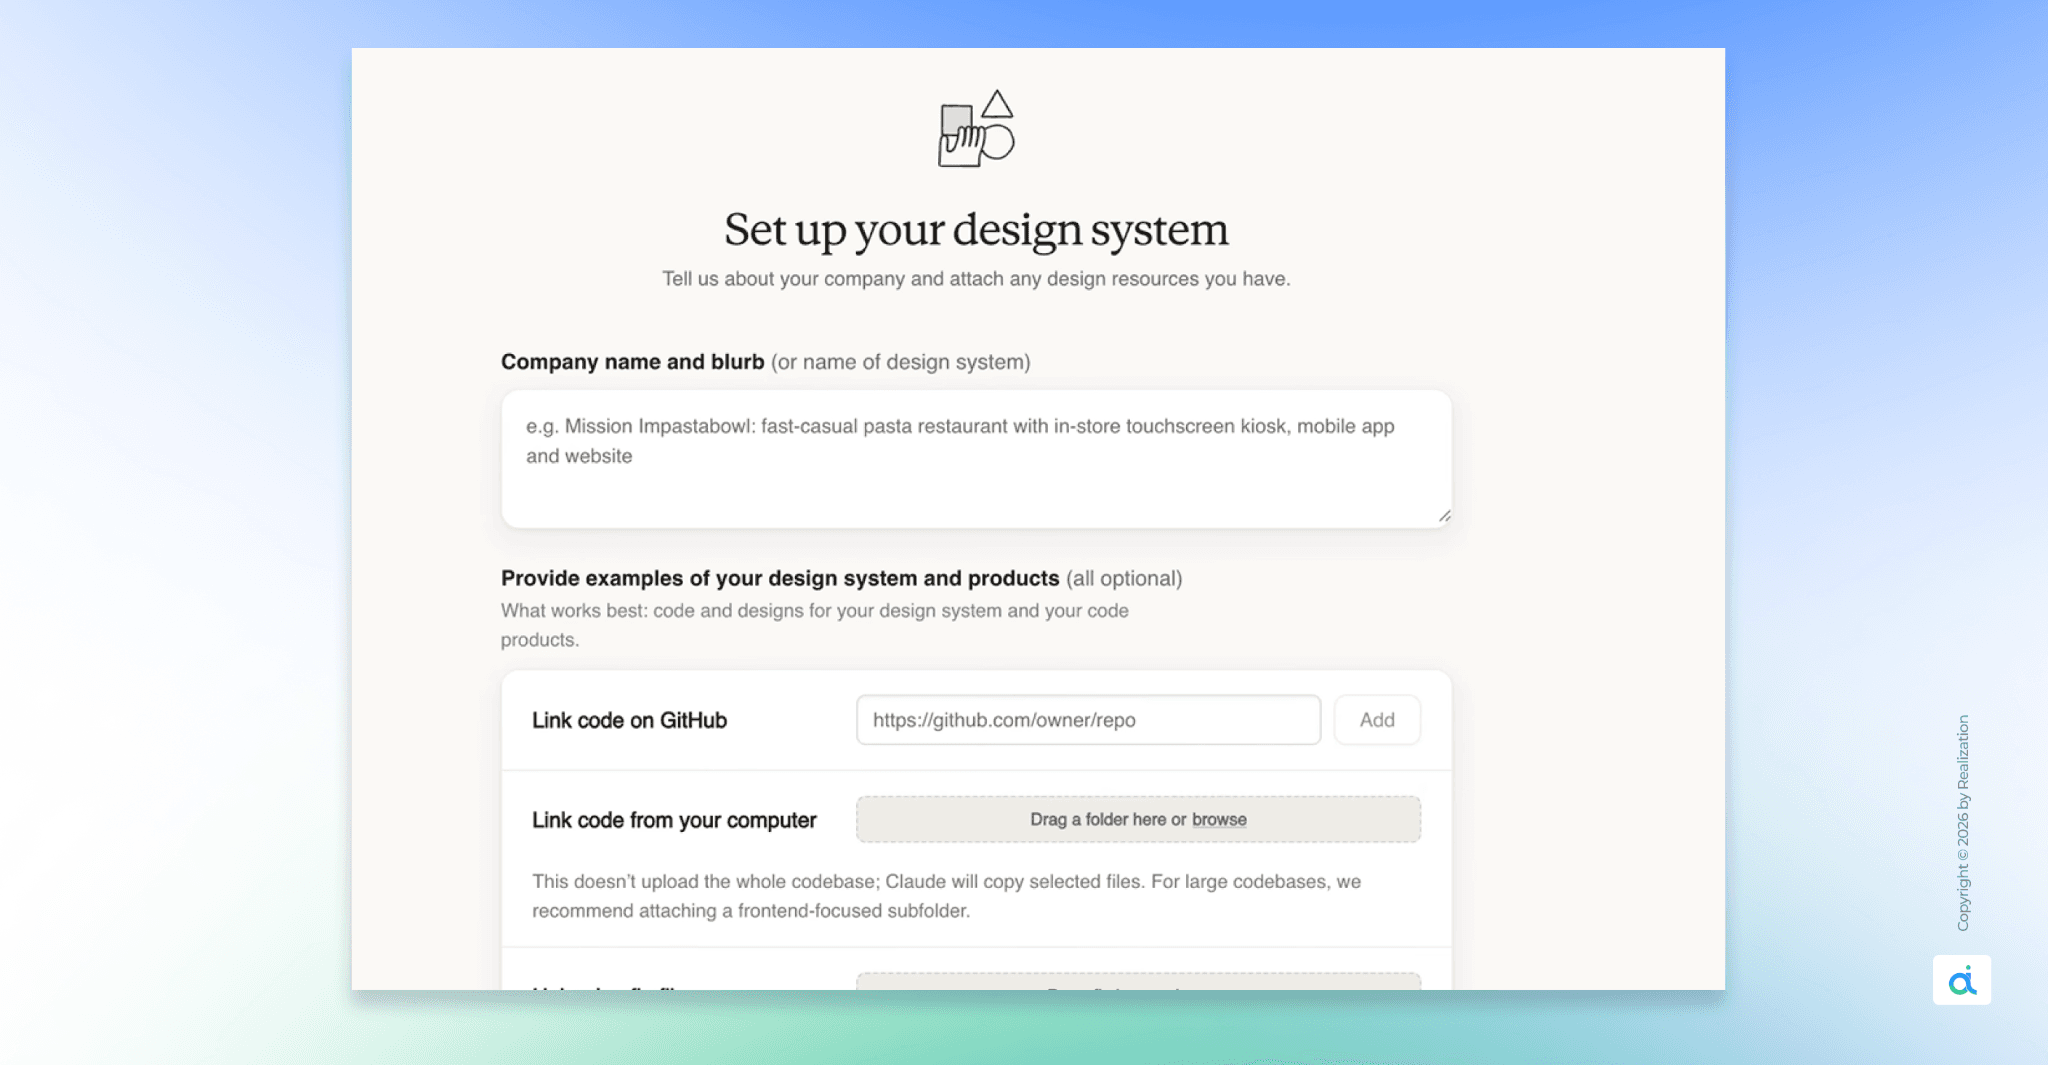
This is the single most important step. Skipping it is the mistake most people make on day one.
Without a design system, Claude guesses.
It picks generic fonts. It defaults to safe blues and grays. Your output will look like a template, not your product.
With a design system, Claude knows your exact colors, your typography, your button styles, and your spacing. Every prototype you build after that will automatically look like it came from your real design team.
During onboarding, Claude builds a design system for your team by reading your codebase and design files.
Every project after that uses your colors, typography, and components automatically. You can refine the system over time, and teams can maintain more than one.
You only set this up once.
Here's exactly how:
Gather your files first.
You can give Claude three types of source material:
- Code files - CSS, HTML, React components, your component library
- Design files -SVG logos, exported brand guidelines, Figma screenshots
- Documents - a PDF or Word doc listing your brand rules
One important tip before uploading:
clean your code. If your CSS has ten different shades of blue left over from old experiments, Claude will pull all of them in and get confused. A clean file produces a clean design system.
Open the workspace and upload.
- Inside Claude Design, click the organization name in the lower-left corner of the project picker.
- Select your organization or create a new one.
- You'll be taken through an onboarding flow complete it, don't skip it.
- Click "New Design System." Drag your files into the upload zone.
Let Claude extract.
- Click "Generate System." Claude reads everything you uploaded.
- It hunts for hex codes, identifies font names, notes your button padding, picks up your heading sizes.
- It builds a full picture of your visual language.
Review what it found.
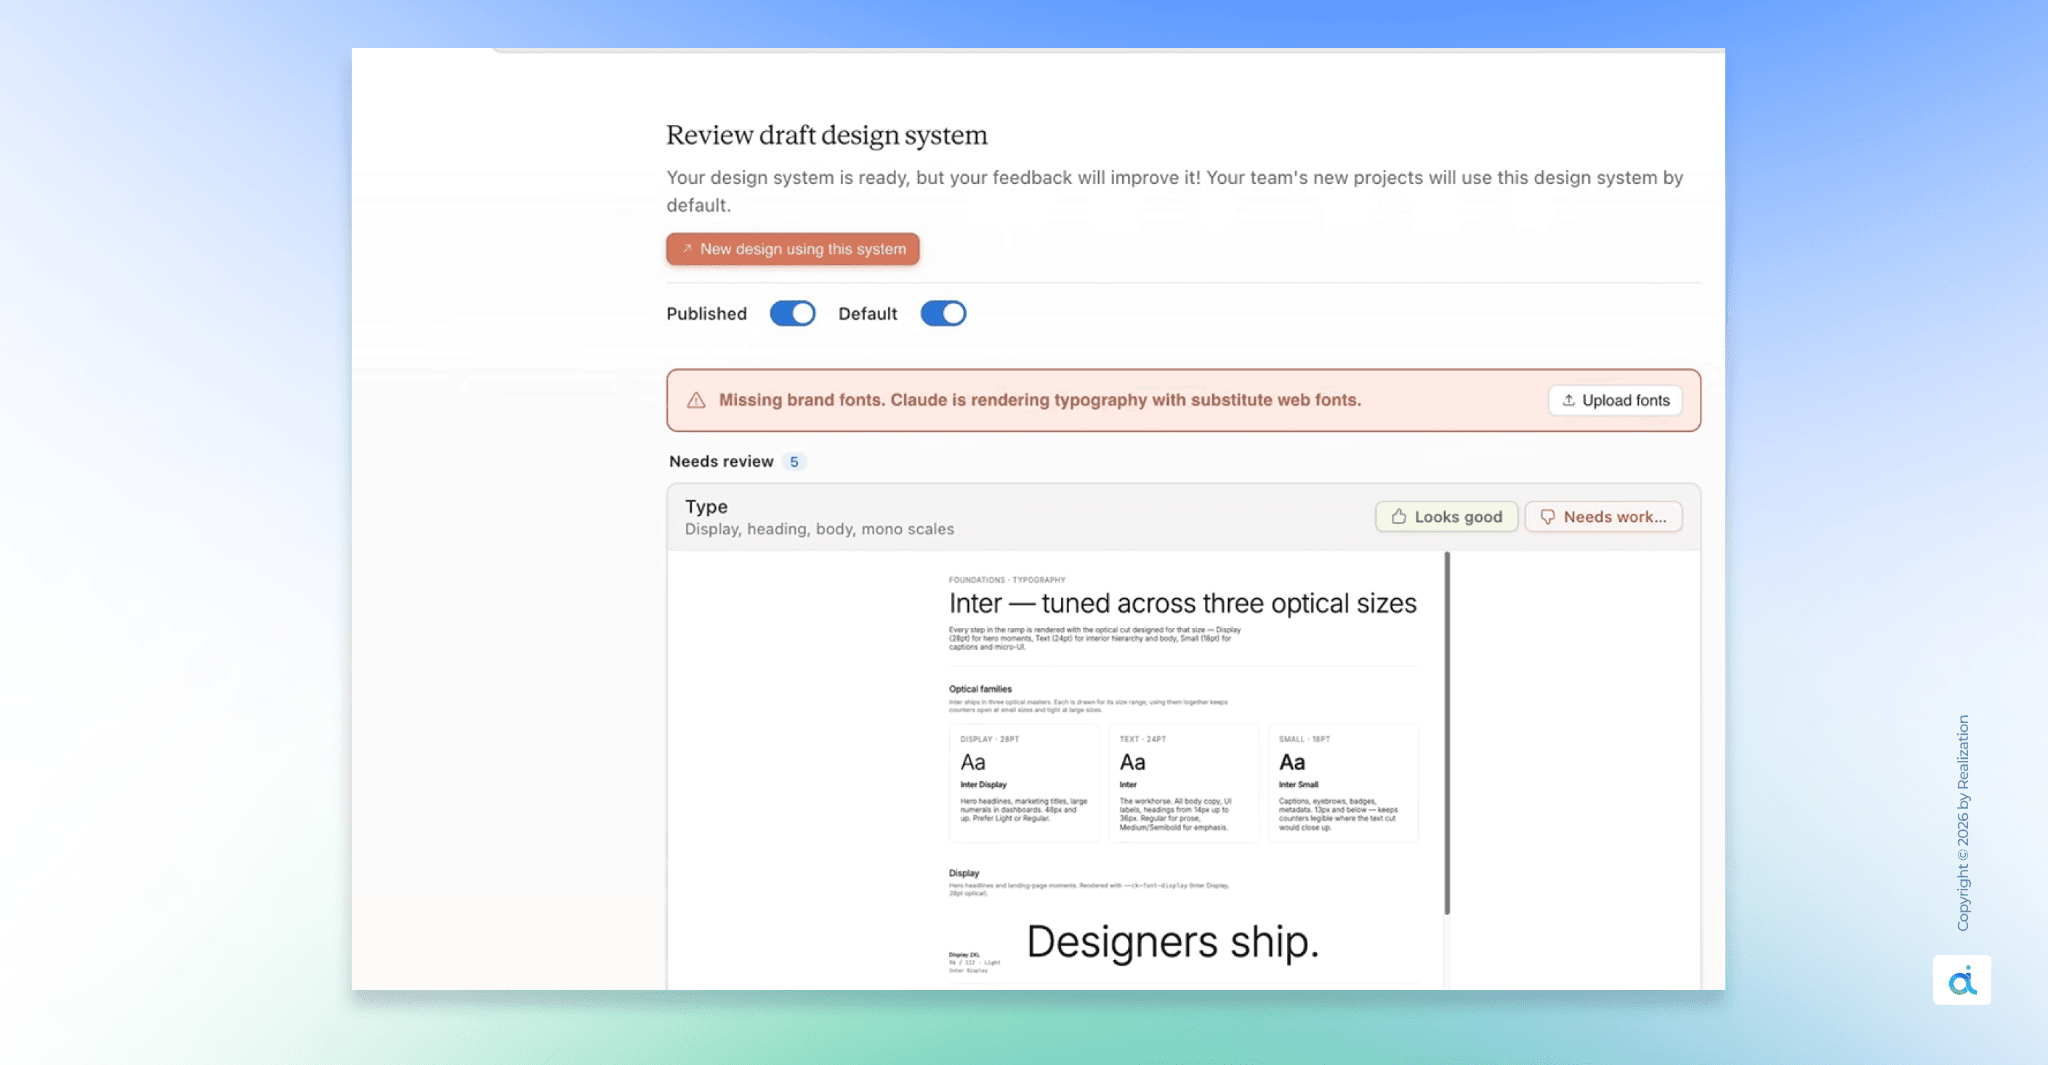
Claude shows you a summary card. Check it carefully:
- Colors - you should see your primary, secondary, and background colors as circles. Make sure nothing is missing or wrong.
- Typography - confirm it picked the right fonts for headings and body text
- Components- it shows a sample button and card. If they don't look right, that's your signal to upload more material.
If something is off, upload additional files and use the Remix button to regenerate. One source file is usually enough to start, but more real examples always help.
Name it and publish.
- Give it a name: "Taskflow Main Brand," "Agency Client A," whatever makes sense. Then switch the Published toggle on.
- Once published, every new project in your organization automatically uses this design system. You will never have to type a hex code into a prompt again.
- If you run multiple clients or products, you can save multiple design systems and tell Claude which one to use at the start of each project.
Step 3: Start your first project
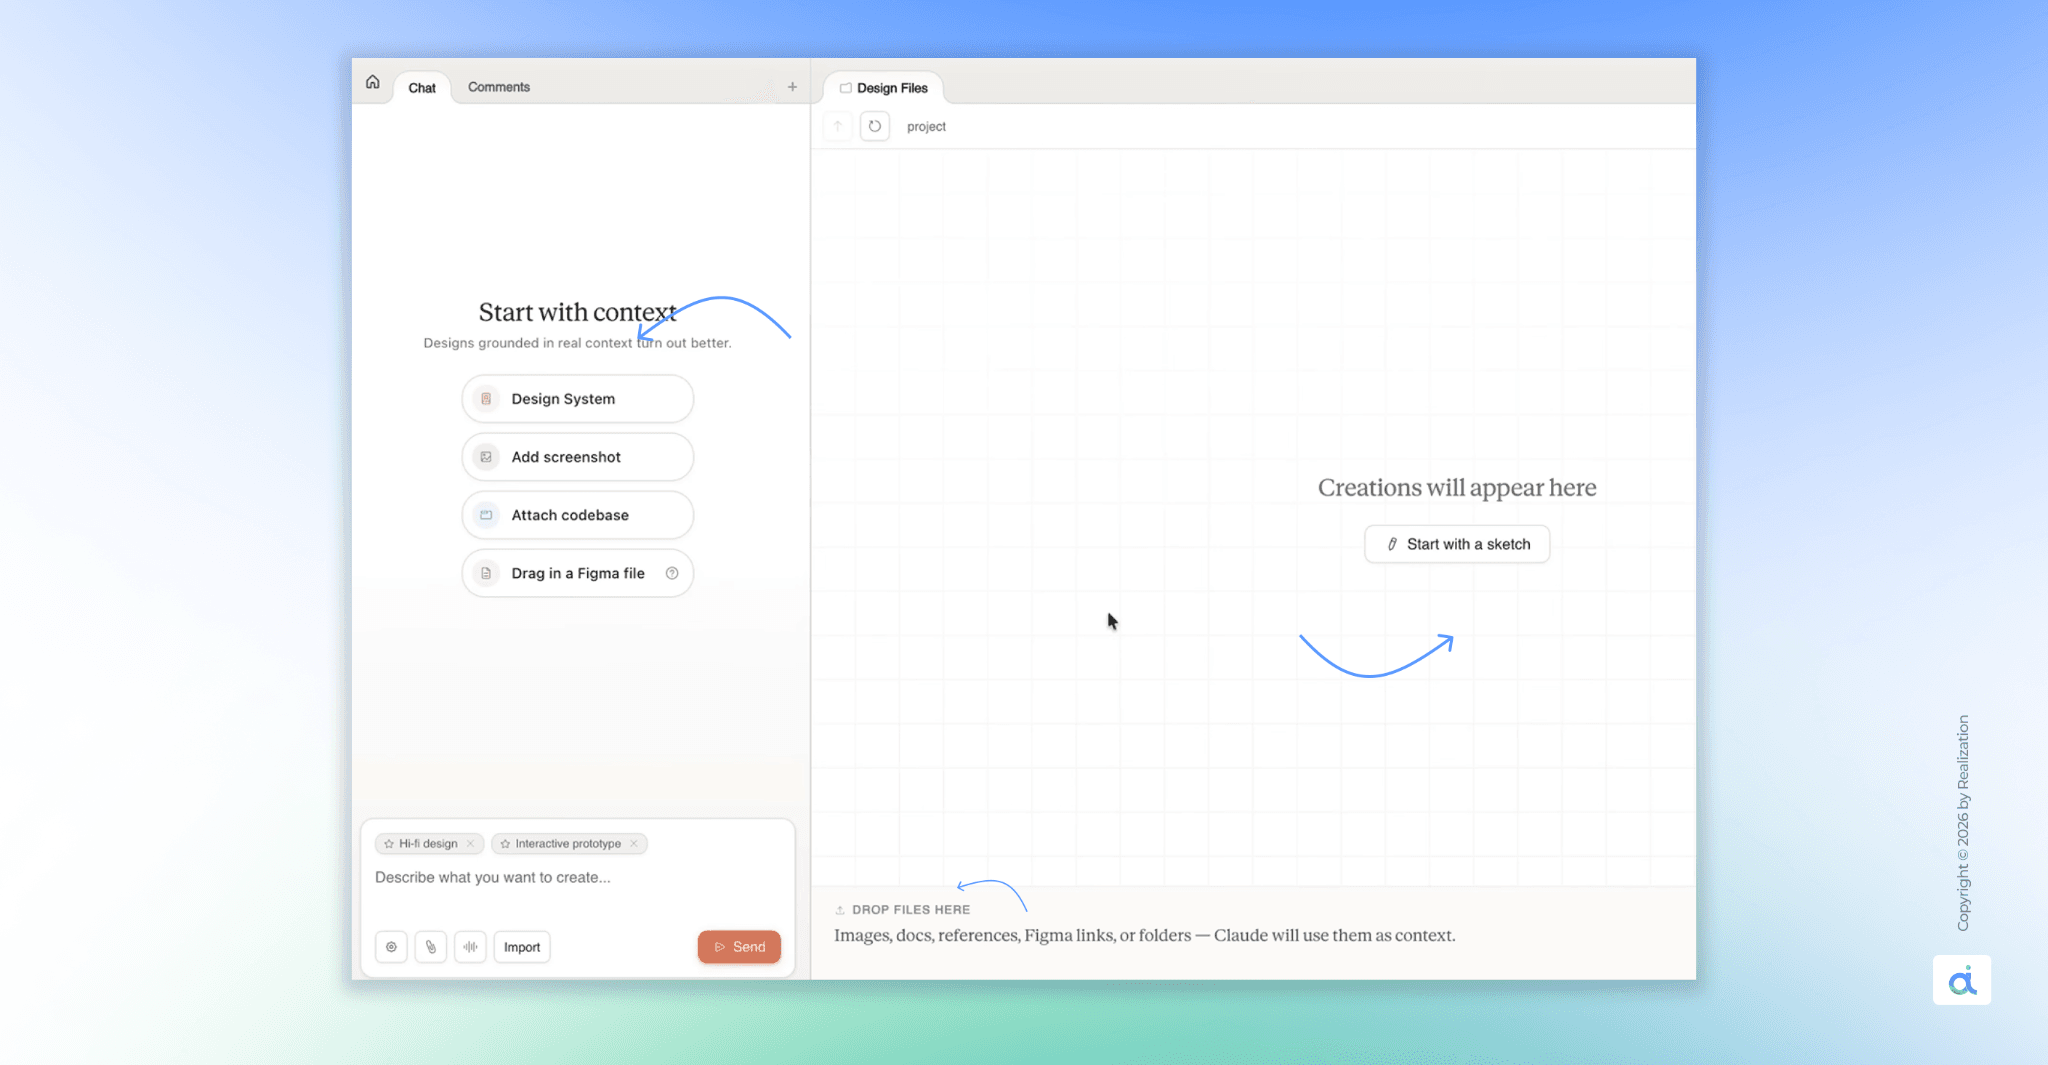
Start from a text prompt, upload images and documents (DOCX, PPTX, XLSX), or point Claude at your codebase.
You can also use the web capture tool to grab elements directly from your website so prototypes look like the real product.
Here are all five ways to start in plain English:
- Text prompt - the most common way. Just type what you want. "Make a three-screen mobile app for a meditation service. Use my brand colors." Fast, easy, effective for most projects.
- Upload a document - upload a Word doc, PowerPoint, or Excel file. Claude reads the content and turns it into a design. Have a business plan sitting in a folder? Upload it and get a pitch deck.
- Upload an image - this one surprises people. Photograph a sketch you drew on paper. Claude looks at it and turns your hand-drawn layout into a clean digital design. Your napkin sketch becomes a real prototype.
- Connect your codebase - if you already have a product, point Claude at your existing code repository. It reads your components and styling and builds new designs that match exactly what you've already shipped. Ideal for teams adding new features to an existing product.
- Web capture - point Claude at a live website URL. It grabs the layout, buttons, and visual elements directly from the page. Useful for competitive analysis or starting a design that references something specific.
Step 4: Write prompts that actually work
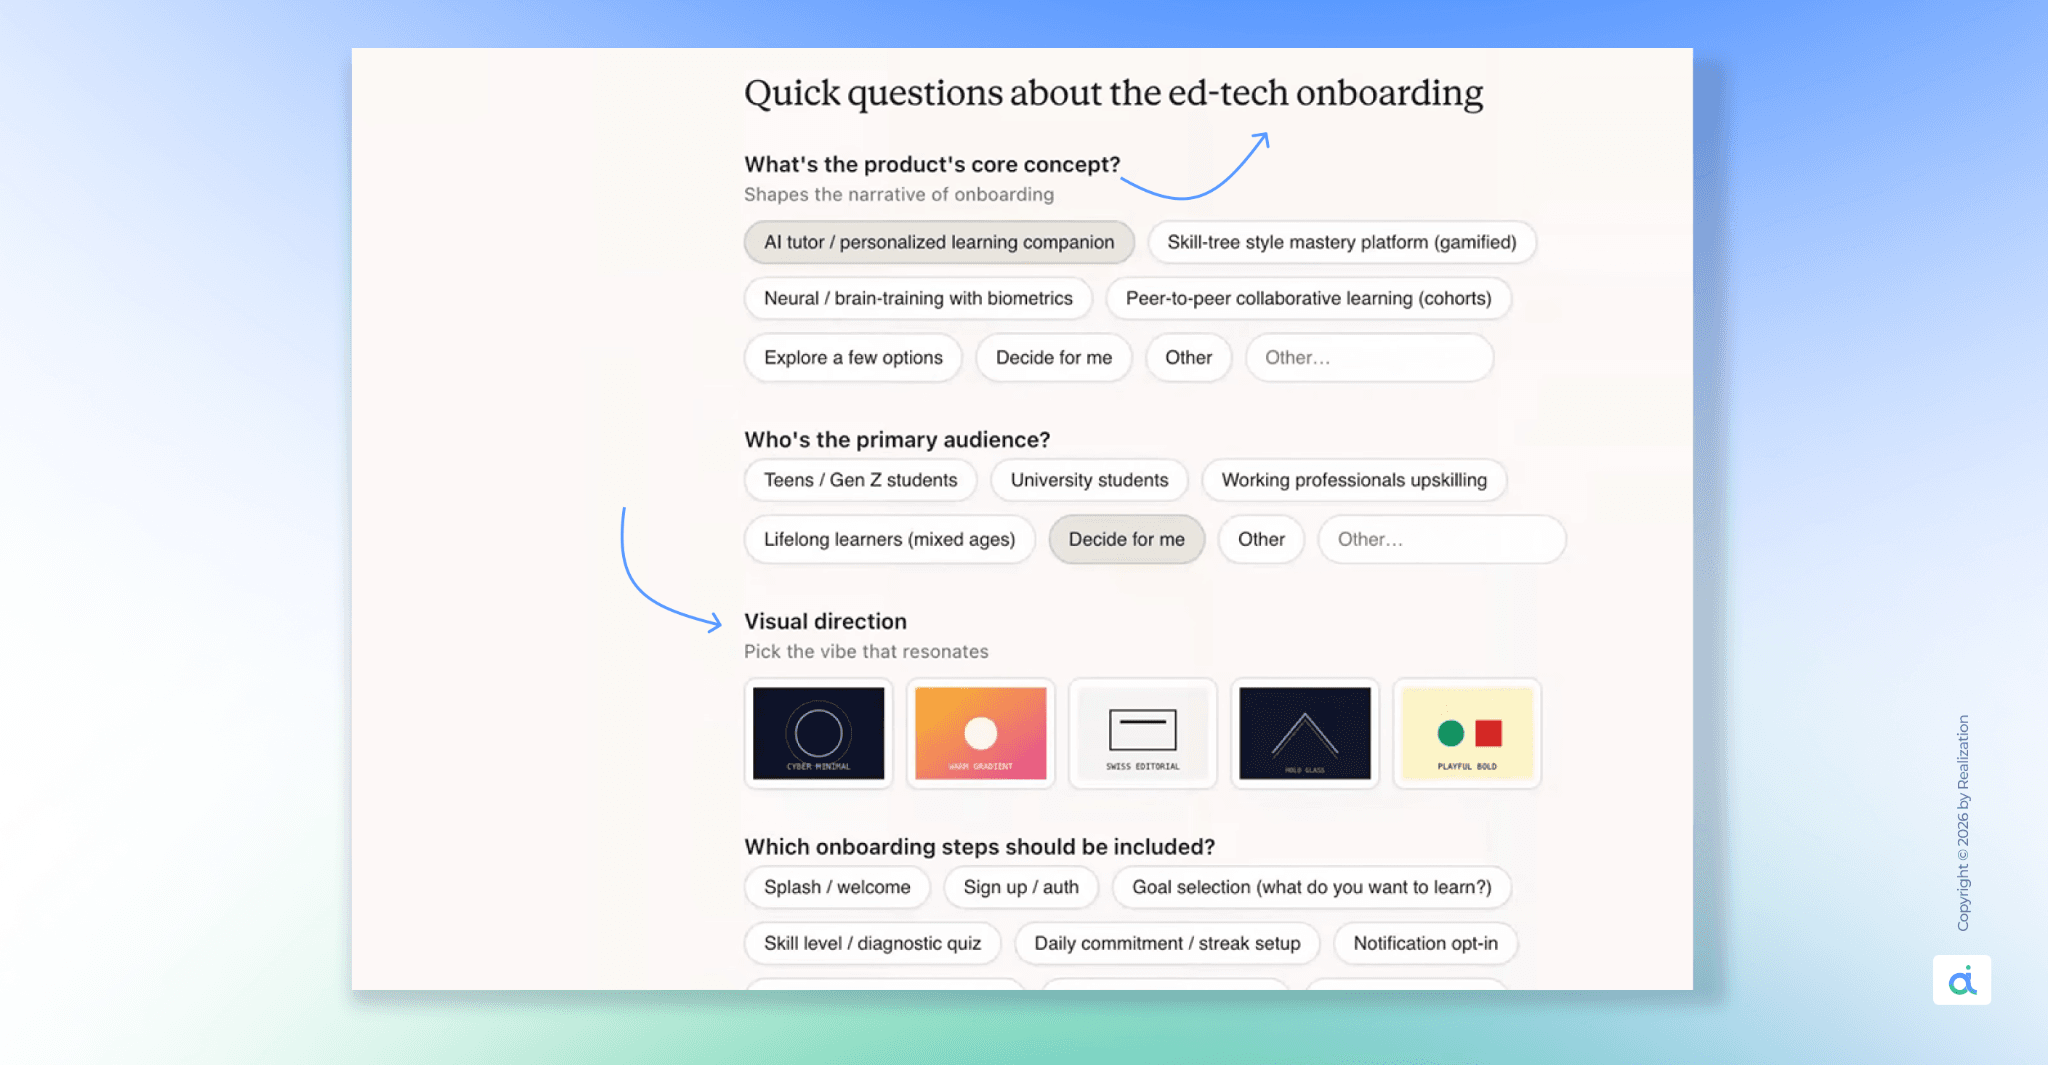
Most people are underprompt. They type "make me a dashboard" and wonder why the output doesn't match what they had in mind.
The fix is simple: give Claude four things in every prompt.
- Goal: What are you building?
- Layout: how should things be arranged?
- Content: what information goes in it?
- Audience: Who is this for?
Here are real prompts that work:
- "Design a three-screen mobile meditation app. Home screen, session screen with a timer, and a library. Calm colors, clean typography. Use my brand system."
- "Build a SaaS landing page for a project management tool. Hero section, product screenshot, three feature cards, pricing table. Modern and minimal."
- "Turn this uploaded business plan into a 10-slide pitch deck for investors. Professional layout. Use my brand colors."
- "Create a one-page sales sheet. Include logo, short description, four key features, and pricing at the bottom."
- "Design an internal content review tool for our ops team. They need to approve submissions. Show a list view and a detail view."
The pattern is the same every time: name the deliverable, say what goes in it, say who it's for.
For more advanced work, anyone can build code-powered prototypes with voice, video, shaders, 3D, and built-in AI. Claude Opus 4.7 writes the complex code behind the scenes. You just ask for it in plain English a 3D model that spins when you drag it, glowing background effects, particle text animations. It handles all of that.
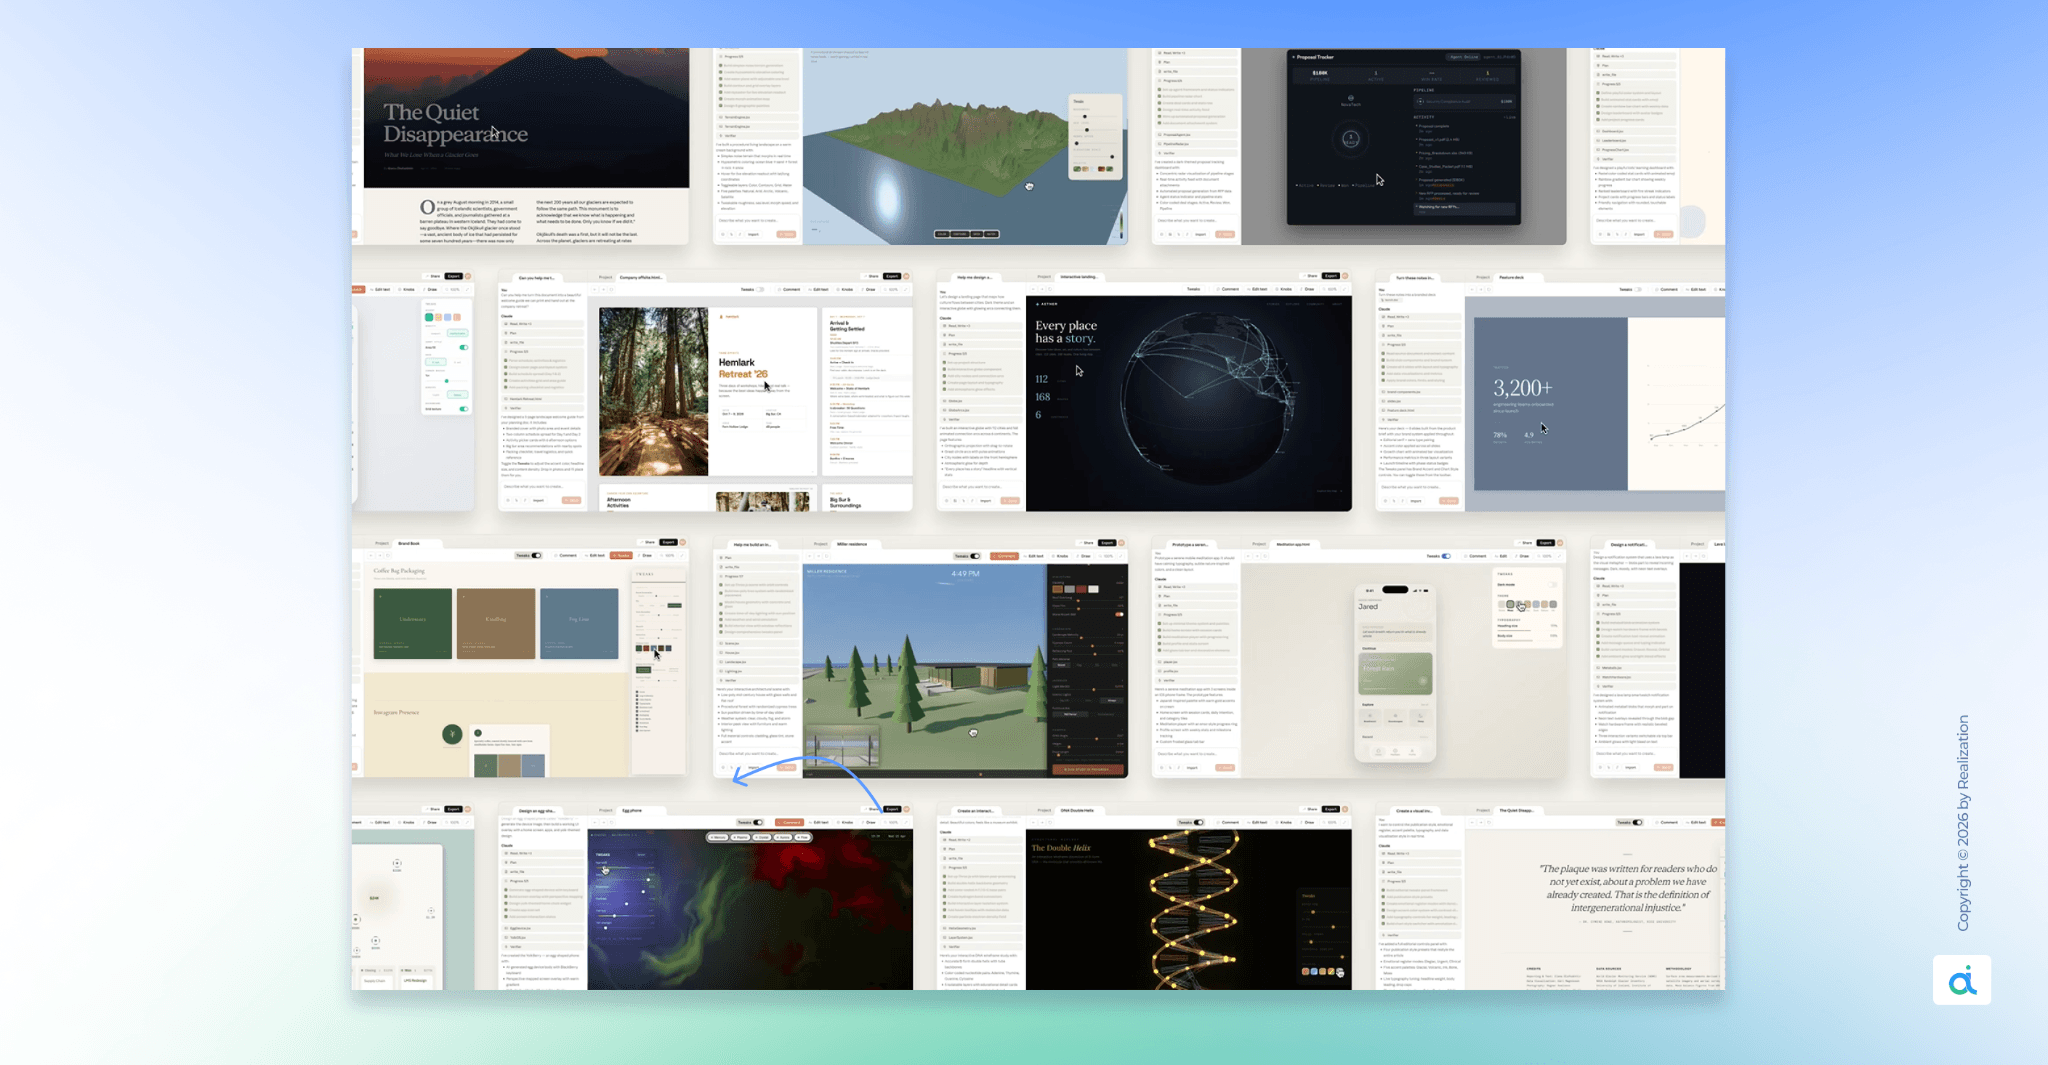
Step 5: Refine and edit
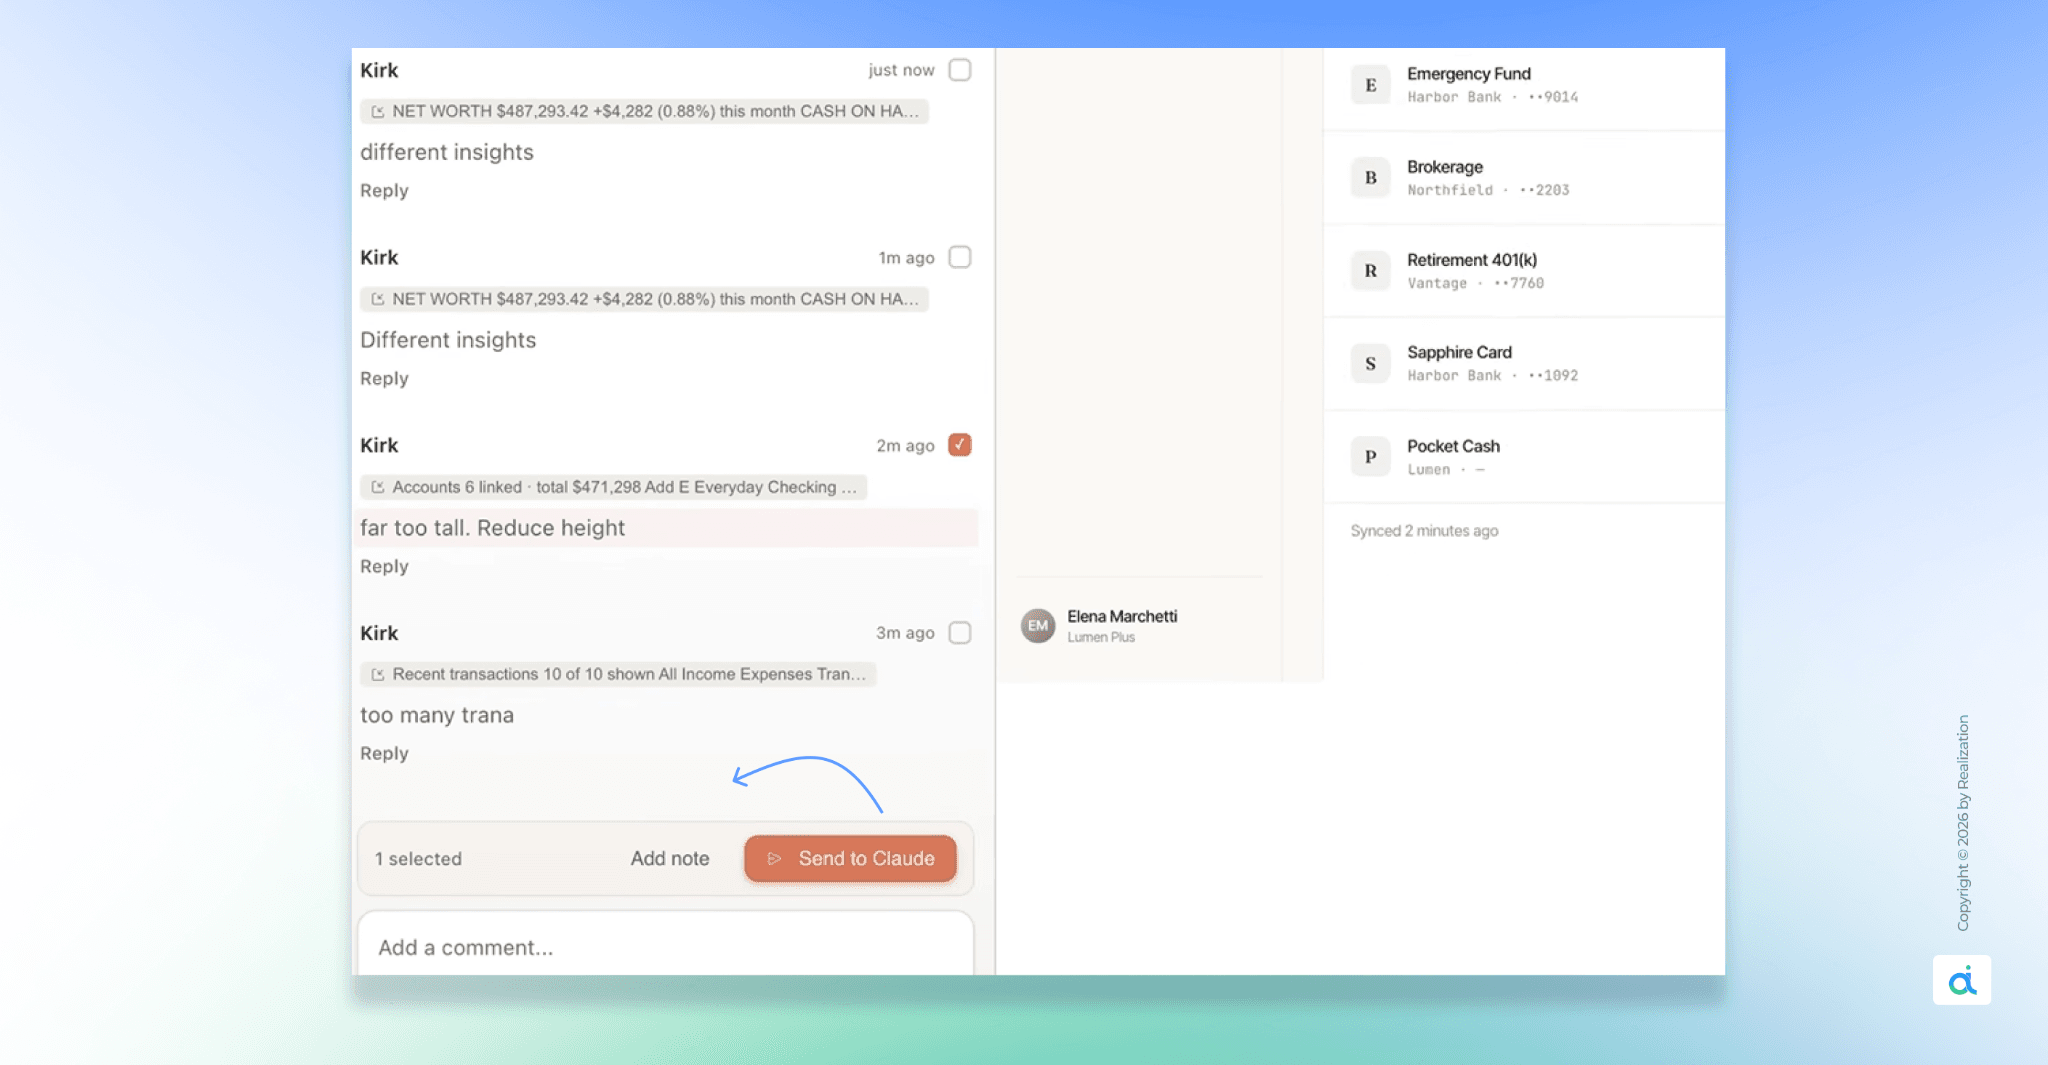
Show Image
The first output is a starting point. From there, you refine through conversation, inline comments, direct edits, or custom sliders (made by Claude) until it's right.
Here's when to use each:
Chat is for broad, structural changes. Use it when you want to rearrange the whole layout, shift the visual direction, add a new section, or explore alternatives. Examples:
- "Make the color scheme darker and more minimal."
- "Rearrange the dashboard so the metrics are in the top row."
- "Show me two alternative layouts for this page."
- "Add a settings panel to the right side."
Inline comments are for targeted, component-level changes. Click directly on the element you want to change and leave your note right there. Claude knows exactly what you're pointing at. Examples:
- "Make this button padding larger."
- "Change this to a dropdown instead of radio buttons."
- "Use the primary brand color here."
- "Make this section collapsible.
One practical note: if inline comments aren't being picked up, paste the feedback directly into the chat instead. This is a known intermittent issue the chat workaround works every time.
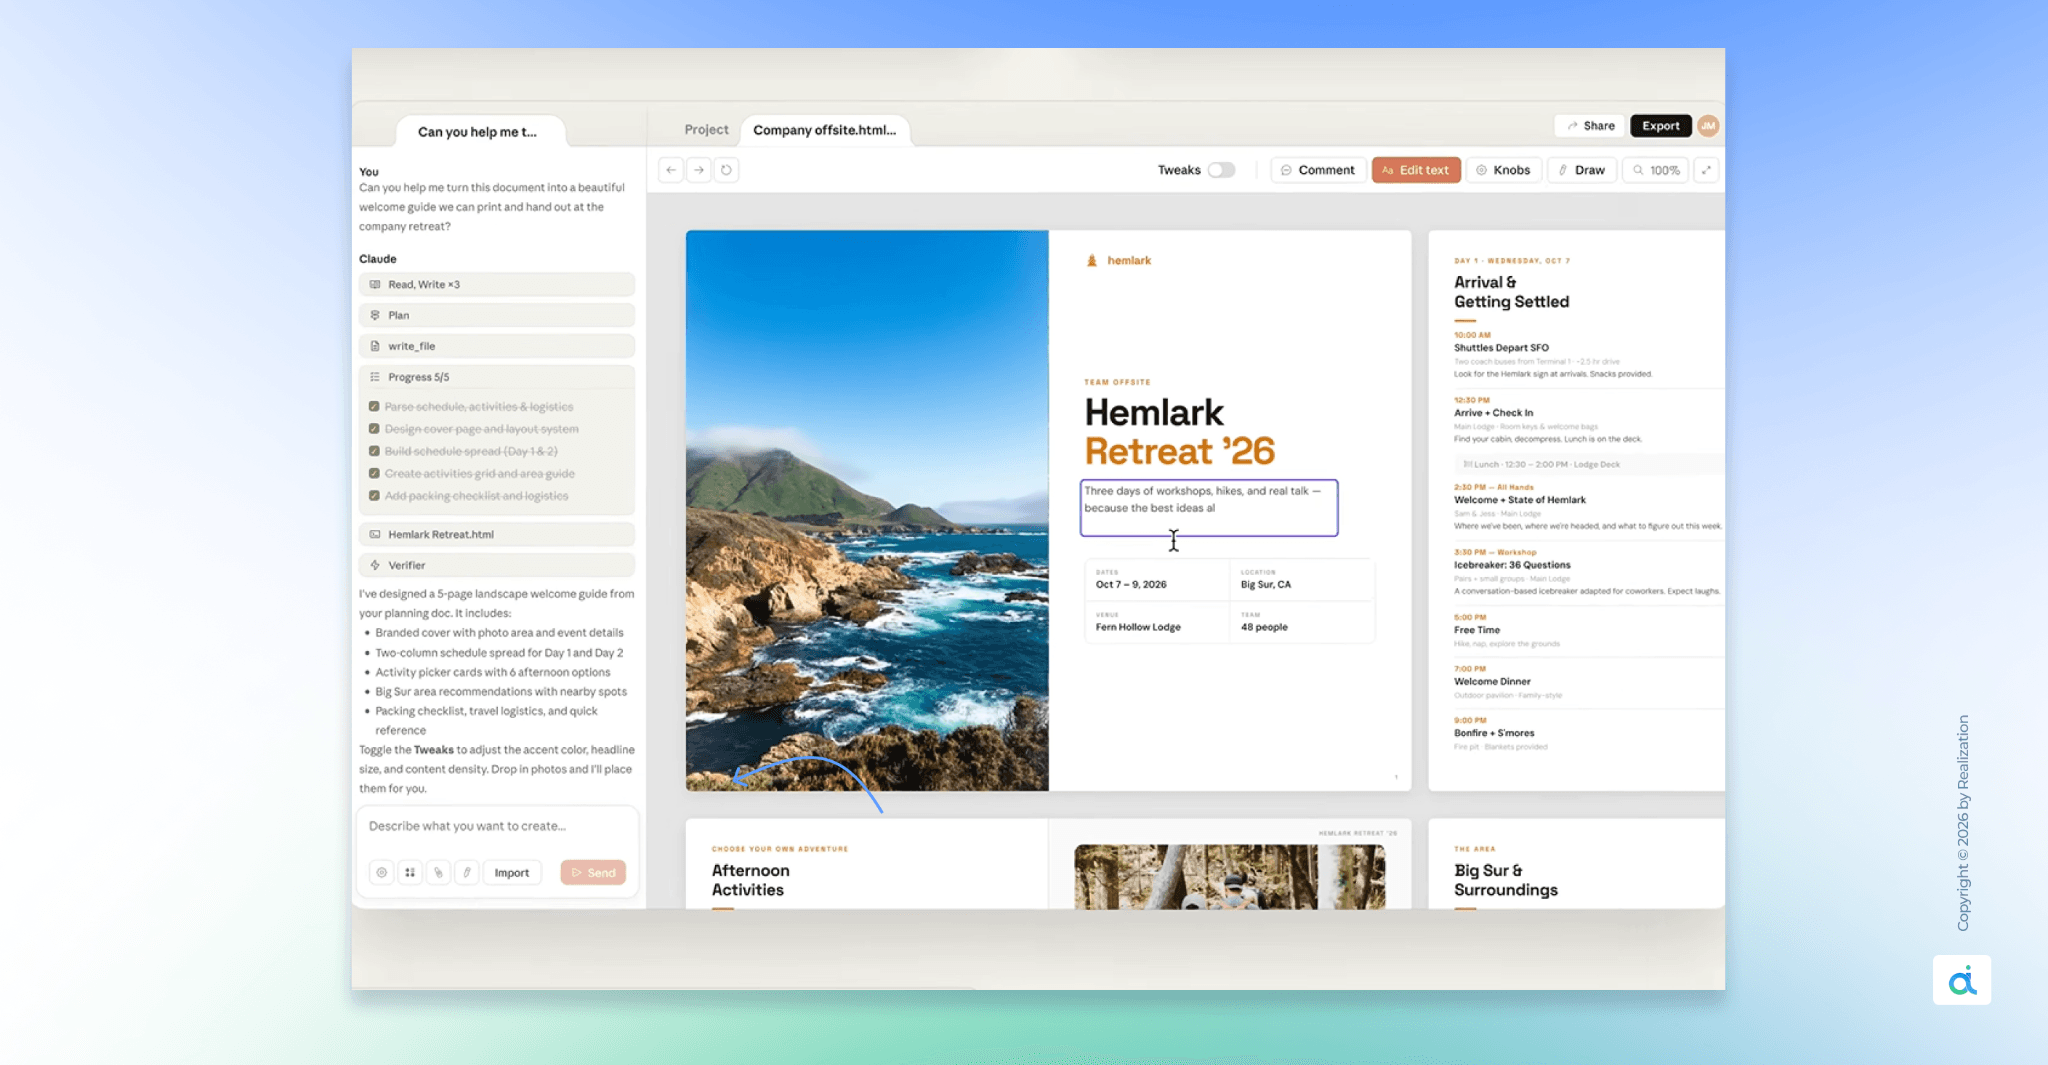
Direct text editing is for copy fixes. If Claude wrote the wrong headline, don't re-prompt. Click the text and type the right word yourself. Fast and direct.
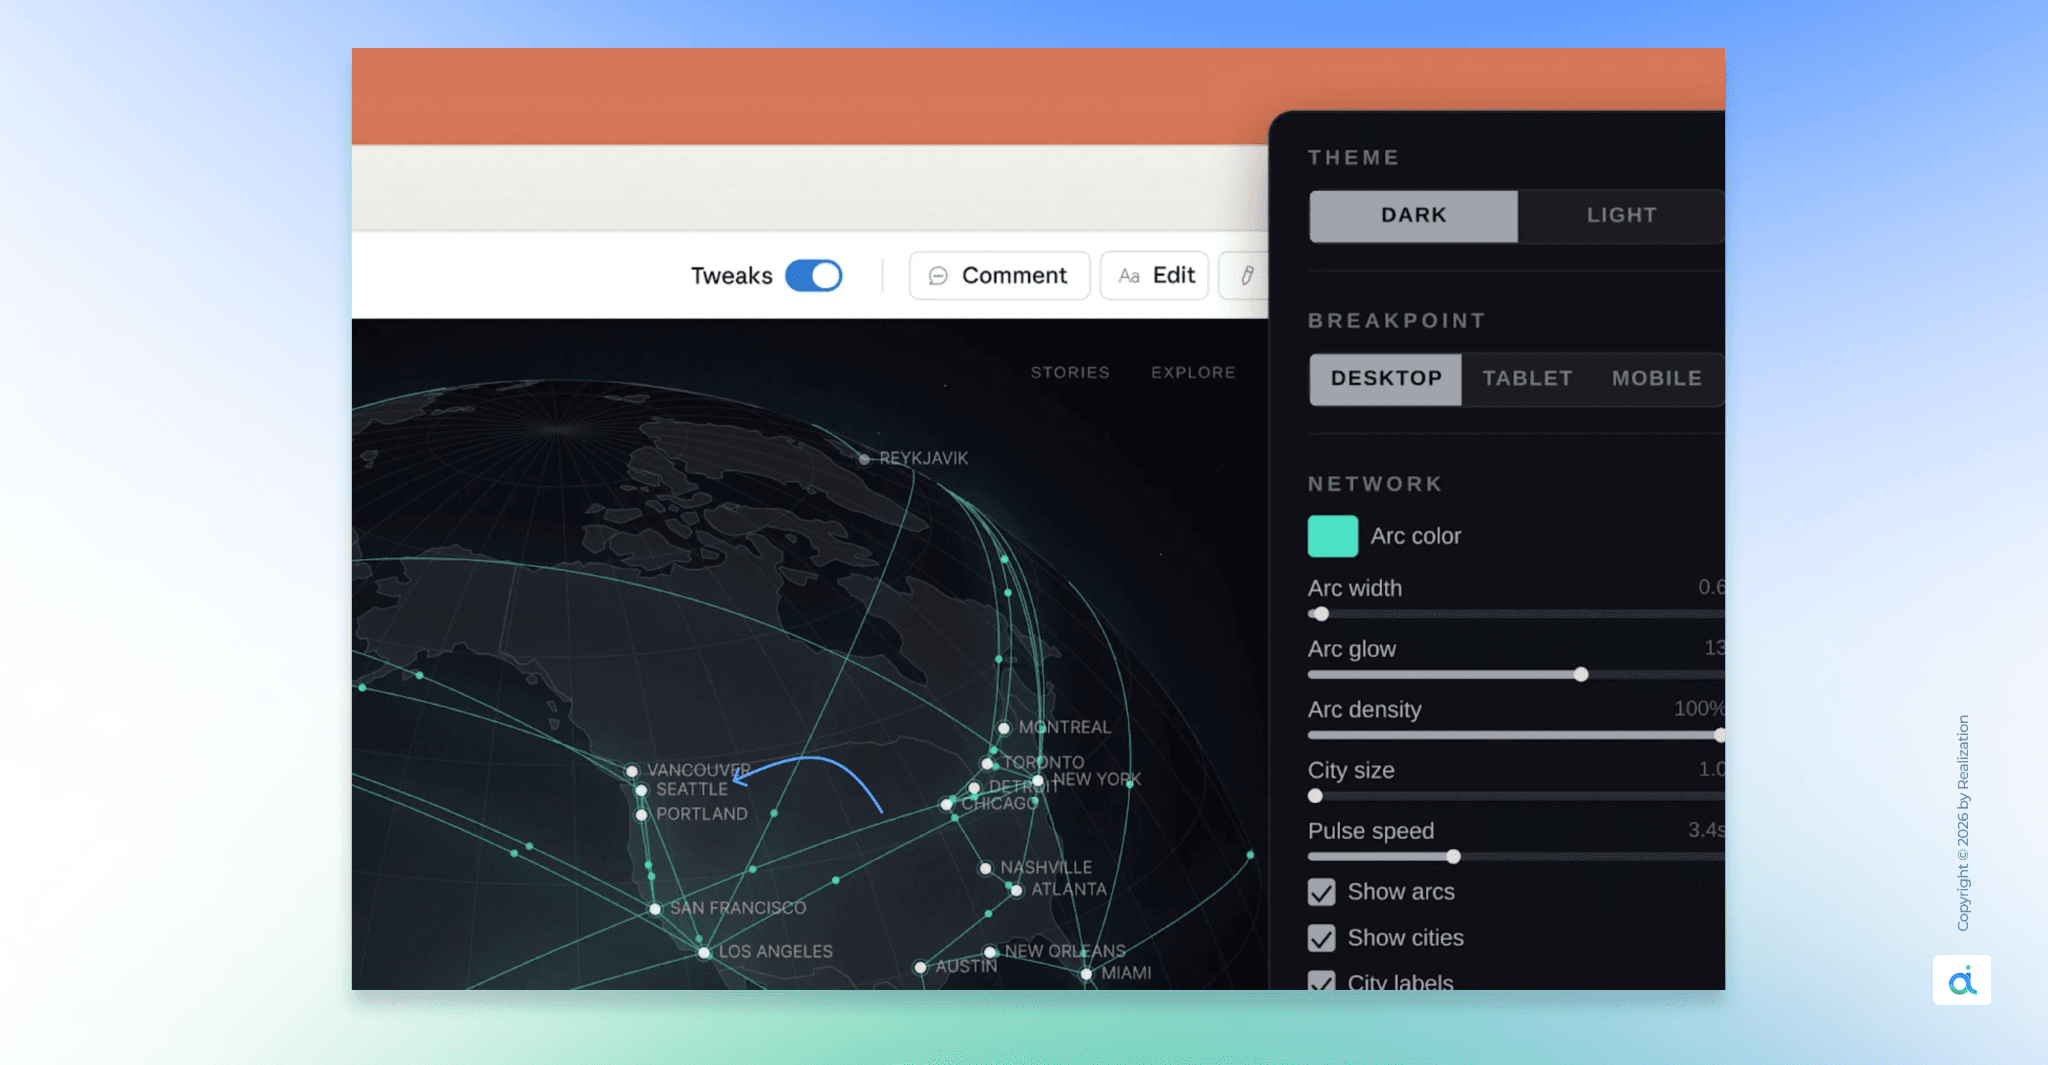
Sliders are for visual adjustments. When you ask Claude to change spacing or color intensity, it sometimes gives you a live slider. Drag left or right and watch the design update in real time. Far faster than prompting "a little more" over and over.
Saving versions: If you want to explore a completely different direction without losing your current work, say: "Save what we have and try a completely different approach." Claude saves your current version and confirms where it's stored. You can come back to any earlier iteration at any point in the conversation.
Step 6: Collaborate with your team
Designs have organization-scoped sharing. You can keep a document private, share it so anyone in your organization with the link can view it, or grant edit access so colleagues can modify the design and chat with Claude together in a group conversation.
A few things to know about collaboration right now:
- You can give teammates view-only or edit access
- Multiple people can type prompts to Claude in the same project
- It is not yet fully multiplayer in the Figma sense you can't see each other's cursors moving around the canvas in real time. That's coming, but it's not there yet.
For most teams, the shared link workflow is enough for reviews and feedback loops.
Step 7: Export your work
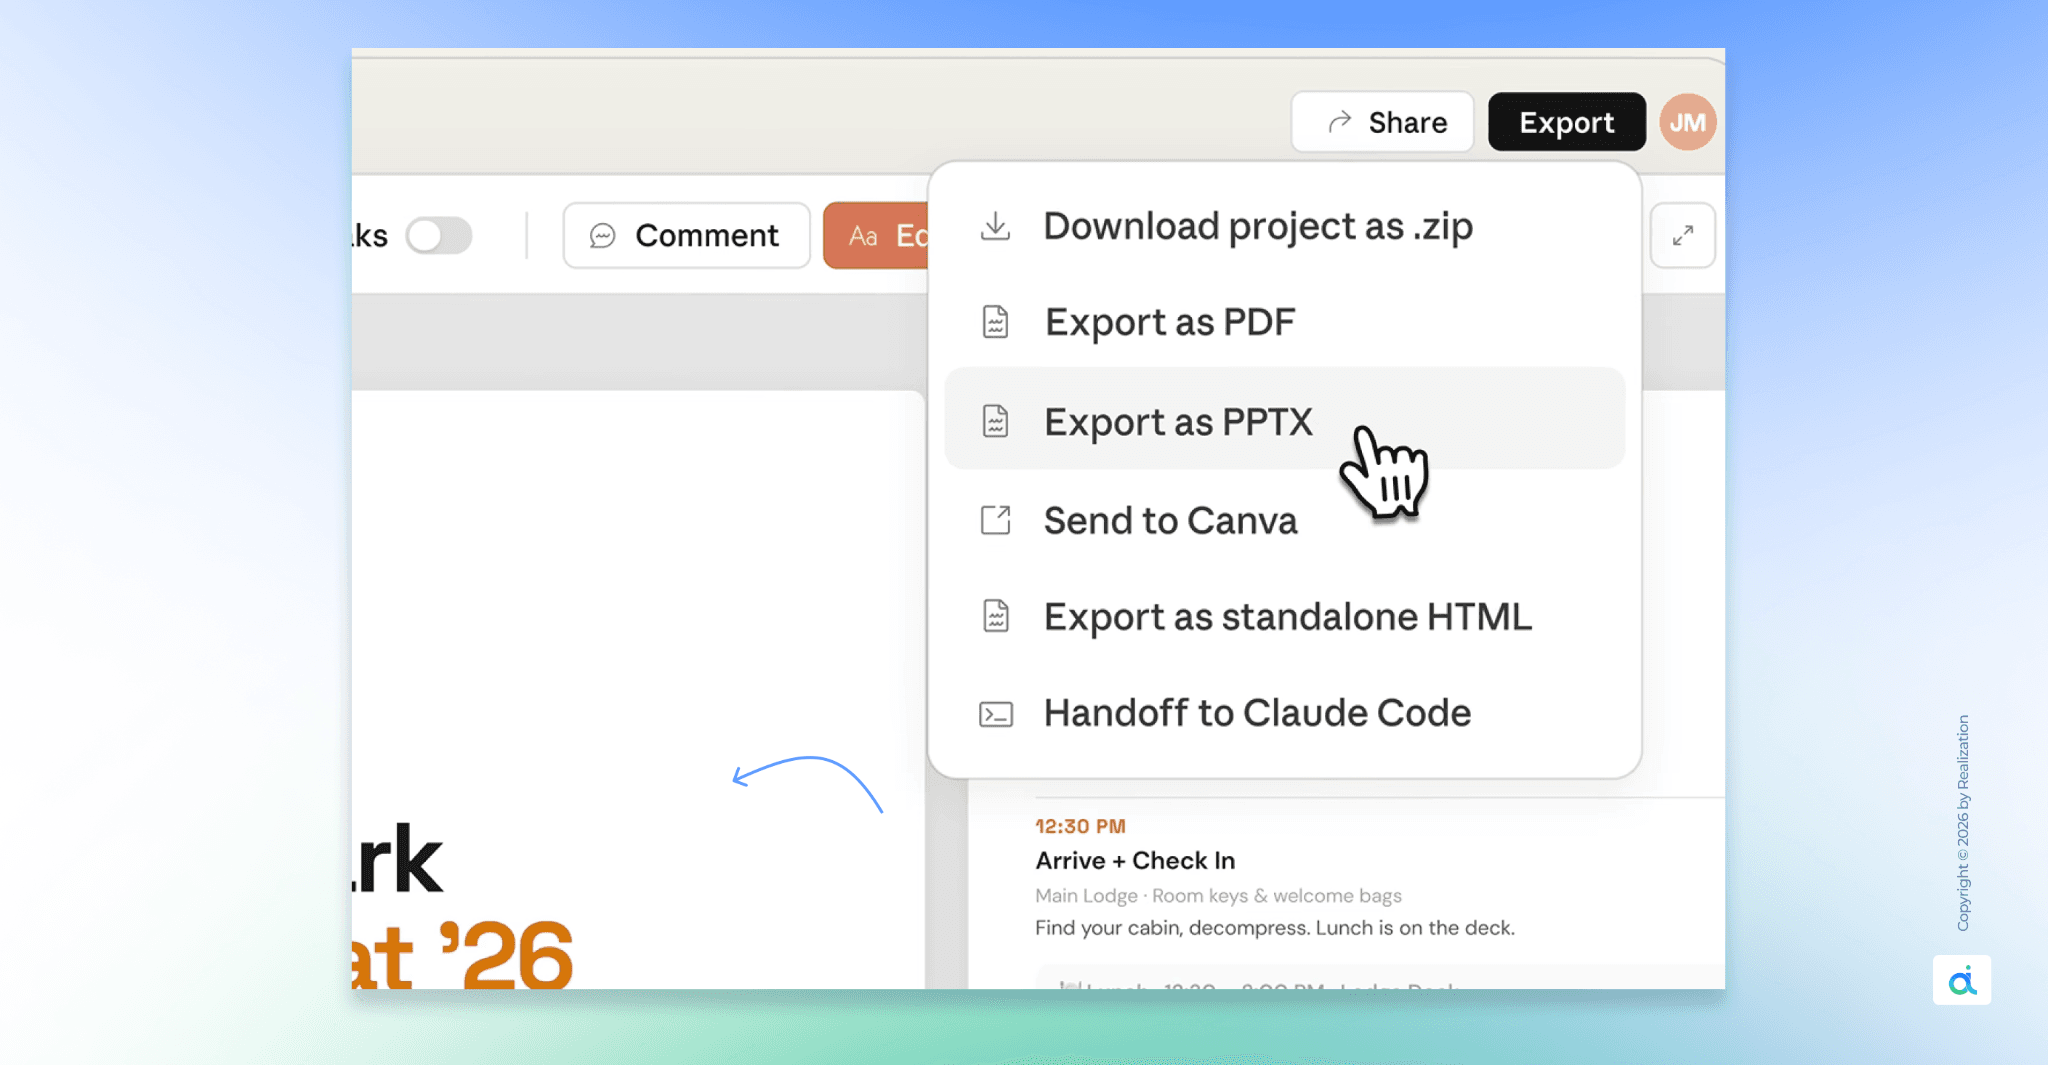
When the design is ready, hit the Export button in the top-right corner. You can share designs as an internal URL within your organization, save as a folder, or export to Canva, PDF, PPTX, or standalone HTML files.
Here's when to use each format:
- Internal URL- fastest option. Share with your team in one click. They can view it in their browser and leave comments if they have access, without needing to download anything.
- Save as Folder - Keeps everything organized inside your Claude workspace.
- Export as PDF- best for pitch decks, one-pagers, and anything you'll email to a client or print.
- Export as PPTX- downloads as a PowerPoint file. You can open it in Microsoft PowerPoint or Google Slides and continue editing the slides yourself.
- Export as standalone HTML- downloads the full HTML, CSS, and JavaScript files. Put them on any web server and share a live URL. Great for website prototypes.
- Send to Canva: this is a big one. Anthropic partnered with Canva, making it seamless for people to bring ideas and drafts from Claude Design into Canva, where they instantly become fully editable and collaborative designs ready to refine, share, and publish.
- Text stays text. Buttons stay shapes. Everything is live and editable inside Canva when it arrives.
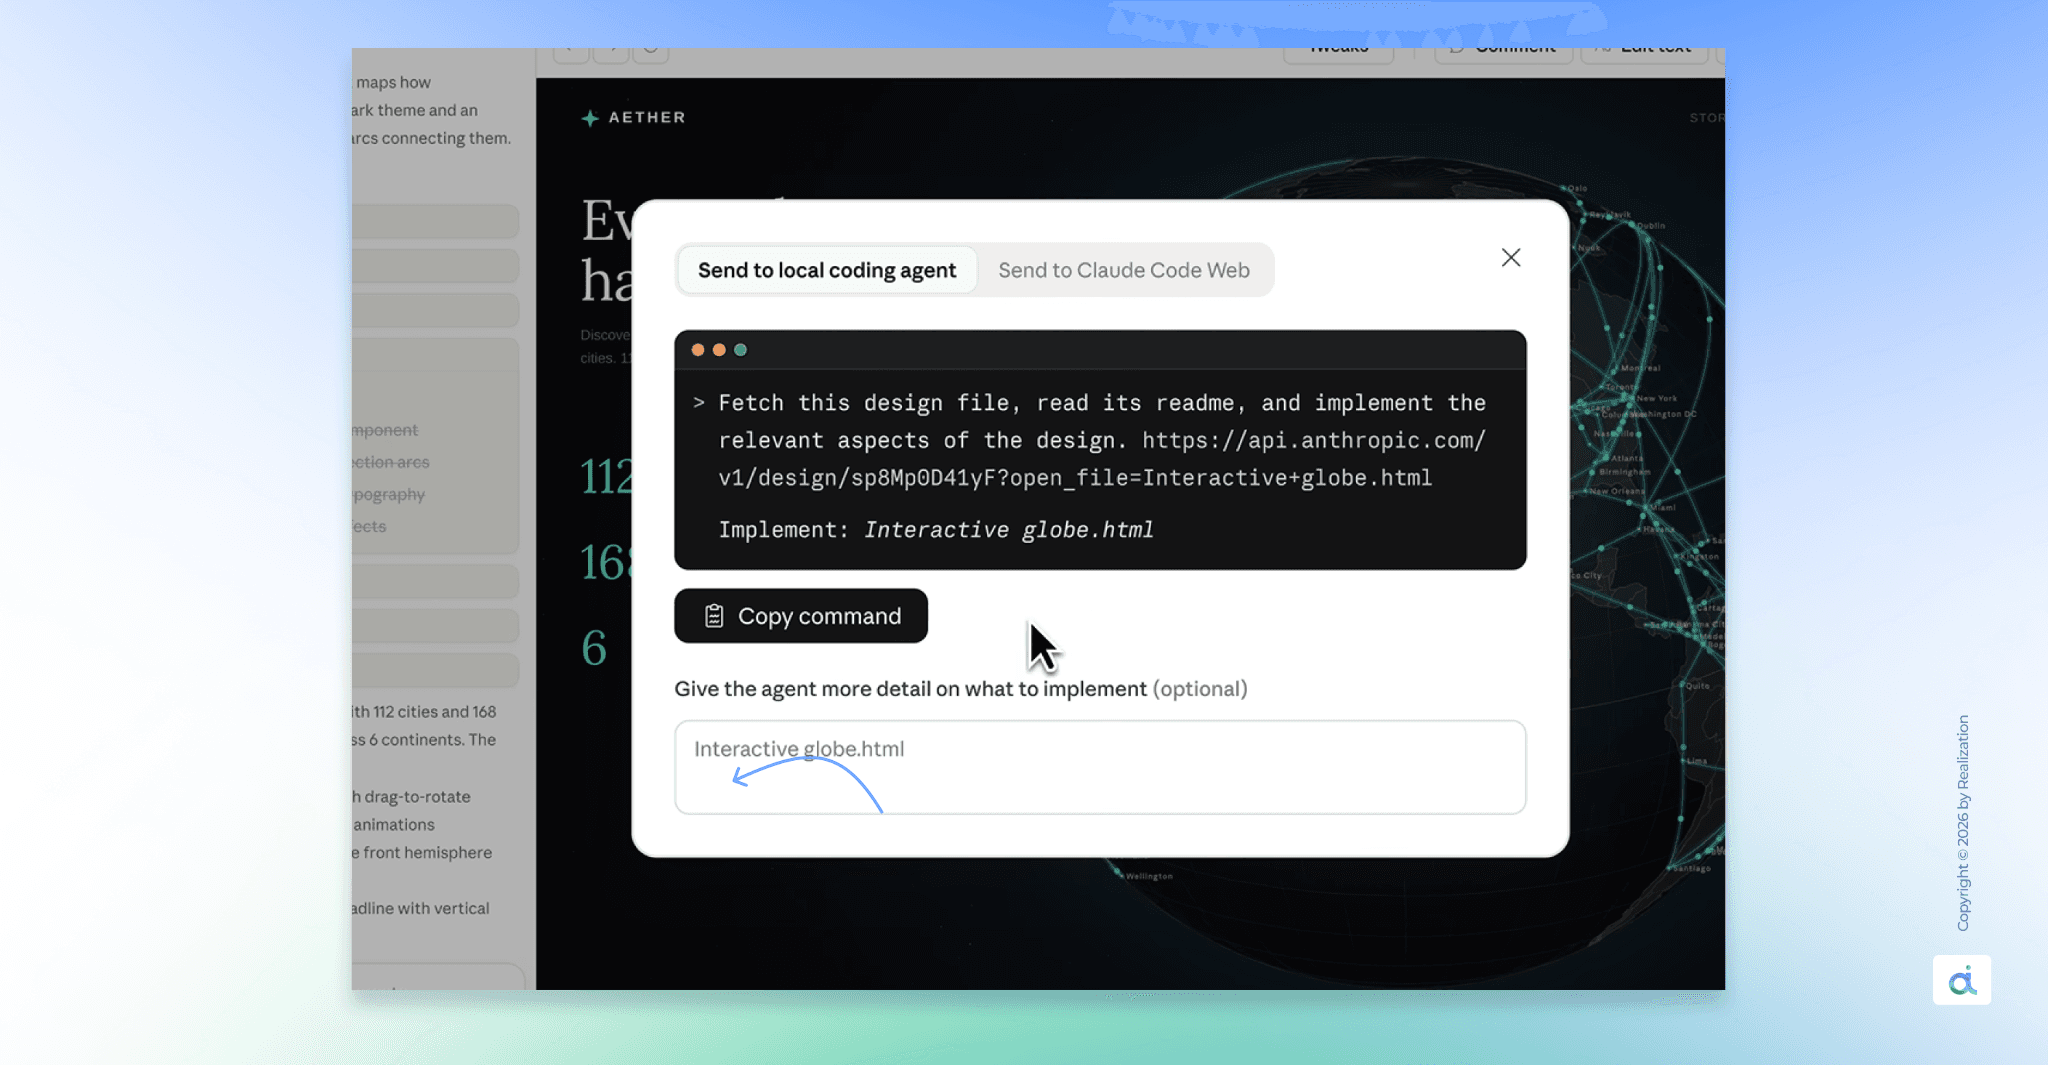
Step 8: Hand off to Claude Code
This is the feature that changes the entire calculus for product teams.
When a design is ready to build, Claude packages everything into a handoff bundle that you can pass to Claude Code with a single instruction.
The bundle contains your component structure, design tokens, copy, and interaction notes. Claude Code reads it and writes production-ready code that matches the design exactly.
Not an approximation. Not a developer trying to reverse-engineer a screenshot. The design becomes the spec, and the spec becomes the code
in the same afternoon.
Brilliant's most complex pages, which took 20 or more prompts to recreate in other tools, only required 2 prompts in Claude Design. Including design intent in Claude Code handoffs made the jump from prototype to production seamless. \
That's the pipeline: idea → Claude Design → Claude Code → shipped product. No handoff meetings.
No lost context. No translation layer between what the designer intended and what the developer built.
Step 9: The full Anthropic ecosystem
Claude Design doesn't exist in isolation. It's one piece of a connected stack.
- Claude for Chrome: research ideas in your browser and save them
- Claude Design: turn those ideas into visual prototypes
- Claude Cowork: Share the prototype with your team for feedback
- Claude Code: hand off the approved design and build it into real software
- Claude for Word / Excel / PowerPoint: write the marketing copy and supporting documents
Over the coming weeks, Anthropic will make it easier to build integrations with Claude Design, so you can connect it to more of the tools your team already uses.
A few honest limitations to know
Claude Design is powerful, but it's still a research preview. A few things to keep in mind:
- Not fully multiplayer yet, no real-time cursors like Figma
- Inline comments occasionally misfire, use the chat fallback if a comment isn't applied
- No direct Figma export, use the Canva route to get there
- Token usage adds up fast. Front-load your design system setup and build templates you can reuse rather than regenerating from scratch every time
Quick reference: prompts that work
- Mobile app "3-screen iOS app for [purpose]. Home, detail, settings. Use my brand system."
- Landing page "SaaS landing page for [product]. Hero, features, pricing. Modern, minimal."
- Pitch deck "10-slide investor deck from this uploaded doc. Professional. Brand colors."
- Sales one-pager "One-page sales sheet. Logo, description, four features, pricing at the bottom.
- Dashboard "Analytics dashboard. Weekly active users, revenue chart, activity feed. Dark theme."
- Advanced UI "App prototype with a 3D globe that rotates on drag. Particle text effects on hero."
That's all for this one.
Claude Design isn't just another AI tool in your stack. It's a structural shift in how product teams move from idea to execution faster, tighter, and with less translation loss between what was intended and what gets built.
The Figma stock dip on launch day wasn't a panic.
It was the market reading the signal correctly.
If you're in AI, product, or tech and
you're still running a separate design → handoff → dev cycle, this is your cue to revisit that workflow.
but the pipeline is simpler now: idea → Claude Design → Claude Code → shipped. That's it.
Set up your design system once. Build from there.
The teams already doing this aren't waiting for permission.
Further Resources
● Start building: https://claude.ai/design
● Official announcement: https://www.anthropic.com/news/claude-design-anthropic-labs
● Design system setup guide: https://support.claude.com/en/articles/14604397-set-up-your-design-system-in-claude-design
● Getting started docs: https://support.claude.com/en/articles/14604416-get-started-with-claude-designe